Current Affairs 8th Class

*   Printing a Presentation     Power Point allows printing slides. Before printing slides, you need to set them up according to your requirements, such as A4 Paper, on screen Slide Show and 35mm Slides.     * To set up the page: 
  • Open the presentation and select Page Setup from File menu.
  • Select the output medium from Slides sized droop down list.
  • Set the orientation, such as Landscape.
  • Click OK.  
  * To print a presentation:
  • Click File -> Print or Press Ctrl + P to open the Print dialog box.  
  * The Print dialog box contains Print what list that has the following options:
  • Slides - Allows one slide per page
  • Handouts - Allows 1,2,3,6 or 9 slides per page. Slides can be ordered vertically or horizontally.
  • Note Pages - Allows one slide per page with additional notes.
  • Outline View -Allows the text of slides in outline format.
  • Click OK.  
      Question.jpg      Which one of the following is the correct step to apply custom animation? (A) Select slide show  Custom Animation (B) Select view show  slide show  Custom Animation (C) Select view  slide show Custom Animation (D) Select slide show  view  Custom Animation (E) None of these     Answer: (a) Explanation Correct Option: (A) Select slide show  Custom Animation. Incorrect Option: Rests of the options are inval   id.             Which of the following options are available in Print what list? (A) Slides                                                             (B) Handouts (C) Note Pages                                                  (D) All of these (E) None of these   Answer: (d) Explanation Correct Option: (D) The print dialog box has Print What list that contains slides, handouts and note pages options. Incorrect Option: Rests of the options are invalid.       You Know.jpg 
  • The original version of PowerPoint was created by Dennis Austin and Thomas Rudkin.
  • First time Power Point 2000 introduced a clipboard.  
    Important.jpg 
  • Outline pane: Allows you to organize and develop the content of the presentation.
  • Slide pane: Enables you to view the looks of the text on each slide.
  • Notes pane: Allows you to add information or speaker note that you want to share with the audience to add graphics in notes.  
  Summary.jpg 
  • Microsoft PowerPoint is basically a presentation of graphics package.
  • You can preview animations on multiple slides by selecting the slides which you want.
  • The process in which the incoming more...

*  Apply Transition     The process in which the incoming slide moves on the screen and the outgoing slide moves off the screen during a slide show thus these special effects applied to crossover between slides are known as transitions.     * To apply transition the following steps are used: 
  • Select Slide Show -> Slide Transition to open the Slide Transition pane.
  • From the Apply to selected slides list select the type of transition.
  • Select the speed from Speed list box and select sound from Sound list box, in Modify transition section. Select whether you want transition of slide automatic or on mouse click, in Advance slide section.

*     Running a Slide Show     When you create 4 to 5 slides, you can run this presentation as a slide show. Slide show means viewing the slides of presentation in succession.     * To run a slide show we need to follow the following steps: 
  • Select Slide Show  View Show. The first slide of the presentation will be displayed and thus it covers the full screen.
  • Click the screen to view the next slide. Alternatively, a menu is displayed when you can click the rectangular shaped icon at the bottom left hand corner of the screen.
  • Then click Next to display the next slide.  
  *  Power Point views Microsoft PowerPoint introduces with different views to help while creating a presentation. Slide sorter view and normal view are the two main views used in PowerPoint. You can click the buttons at the lower left of the PowerPoint window to easily switch between views.     * Slide Sorter View You can see all the slides in the presentation on screen at the same time in the slide sorter view, displayed in miniature. It makes easy to move, add and delete slides. You may also preview animations on multiple slides by selecting the slides you want to preview and then clicking Animation Preview on the Slide Show menu. You can also add special effects, such as animation and sound on title text, bulleted text, sub title text and picture. For example: Text moving from left to right and top to bottom with background sound is called animated slide. You can also add some special effect in your slide.     * To apply animation in slide: 
  • Select the slide and select slide show -> Custom Animation.
  • Select the Object (s) from Check to Animate slide object box. Select effects from Entry Animation and Sound list box and click OK.

*   Basic Elements of Slides       The following table lists the basic elements of slides:  
           Pane                                         Description
  Outlinepane                               Slide pane                        Notes pane Allows you to organize and develop the content of the presentation. You can type all the text of the presentation and paragraphs and slides, and rearrange bullet points.   Enables you to view the look of the text on each slide, you can add movies, graphics and sounds, add animations to individual slides and create hyperlinks.   Allows you to add information or speaker notes that you want to share with the audience, to add graphics in notes; you need to add the notes in note page view.
  *  Adding Text in the Layout You need to click "Click to add title area "of the slide layout and thus type the title of the presentation. In the same way, click "Click to add subtitle" area of the slide layout and then type the subtitle of the presentation.     *  Inserting a New Slide How to insert a new slide in the presentation:
  • Select Insert -> New Slide.  
  *  Changing the Layout of a Slide How to change the layout:
  • Select the slide in which the layout needs to be changed.
  • Select the appropriate slide-layout from the Slide Layout pane.      
    Question.jpg        Which one of the following panes enables viewing the look of the text on each slide? (A) Note pane                                                   (B) Slide Pane (C) Outline Pane                                               (D) All of these (E) None of these     Answer: (b) Correct Option: (B) Slide enables you to view the look of the text on each slide; you can add movies, graphics and sounds, add animations to individual slides and create hyperlinks. Incorrect Option: (A) Note pane allows you to add information or speaker notes that you want to share with the audience, to add graphics in notes; you need to add the notes in note page view. (C) Outline pane allows you to organize and develop the content of the presentation. You can type all the text of the presentation and paragraphs and slides, and rearrange bullet points.          Jack is preparing a power point presentation. He wants to insert a new slide in the presentation. Which one of the following more...

*   Introduction to Power Point   Microsoft PowerPoint is basically a presentation of graphics package, which helps in the formulation of presentations requiring slides. With the help of PowerPoint, slides can be prepared quickly and having a consistent look to the presentation. The use of slides enhances the effectiveness of communication and clarity of subject material to the audience as well as its retention by them.     * To start PowerPoint:  Click Start and Select Programs  Microsoft Office  Microsoft Office PowerPoint 2003 to open the Microsoft PowerPoint window.     *  To open a blank presentation: 
  • Click create a new Presentation link on the Getting Started pane. A new window opens.
  • Click Blank presentation link on the New Presentation pane, when a new presentation opens, the Slide Layout pane on the right side of the window appears.  
  • Select the layout which you want to select by double-clicking on any one of them.  

*  Thesaurus   Thesaurus allows looking word in another language. If your document is written in French and you want to see the synonyms of that word use thesaurus.     *  To use thesaurus:   
  • Click Research on the Tools menu to open the research dialog box, as shown in the following figure:
  • In the Search for list, select Thesaurus.
  • Press ALT and click the word you want to look up.
  • Results will appear in the Research task pane.  
        Question.jpg       Jack creates a document. The text of document contains big gap between two letters. Which one of the following processes Jack will use to move letter closer together? (A) Kerning                                                         (B) Thesaurus (C) WordArt                                                       (D) All of these (E) Both A and B     Answer: (a) Explanation Correct Option: (A) Basically kerning is a process of moving letters closer together, in an effort to overcome the illusion of too much space between letters. Incorrect Option: (B) Thesaurus allows looking word in another language. (C) WordArt is an auto shape toolbar in Microsoft Word 2003 that allows creating a variety of three-dimensional word shapes in document.          Steve writes a document in English language. He wants to check few words in French language. Which one of the following helps in finding words in another language? (A) Kerning                                                         (B) Thesaurus (C) WordArt                                       (D) All of these (E) Both A and B     Answer: (b) Explanation Correct Option: (B) Thesaurus allows finding words in another language. Incorrect Option: (A) Basically kerning is a process of moving letters closer together, in an effort to overcome the illusion of too much space between letters. (C) WordArt is an auto shape toolbar in Microsoft Word 2003 that allows creating a variety of three-dimensional word shapes.          Which one of the following statements is true? Statement A: The Save As command can be used in three cases. Statement B: Page Setup includes only page margins. (A) Statement A is correct (B) Statement B is correct (C) Both Statement A and B are correct (D) Neither statement A nor statement B is correct     Answer: (a)   Explanation Correct Option: (A) The Save As command can be used in three cases. Incorrect Option: (B) Statement B is wrong because page setup includes page margins and page setting.       You Know.jpg   
  • Office Assistant provides link to open Word Help  
    Important.jpg 
  • Kerning: Is a process of moving letters closer together, in an effort to overcome the illusion of too much space between letters
  • Word Art: Is an auto more...

*   Creating Tables   Some time you need to represent information in tabular forms. Word 2003 enables the facility to insert a table in word document easily. You can apply various functions, such as insert and delete data. You can also increase or decrease number of columns and rows according to your requirements.       * To insert a table in word document: 
  • Place the cursor where you want to place the table.
  • Select Table  Insert  Table to display the Insert Table dialog box.
  • Set the number of columns in the Number of columns text box.
  • Set the number of rows in the Number of rows text box.
  • To close the Insert Table dialog box Click OK.
  • A table with the defined number of rows and columns will get inserted in the document.  
You can move the cursor in table by tab key or arrow key or click in the appropriate cell. After inserting table in a document, it can be modified as require. The columns and rows can be added to the table or deleted from the table.     * To add a row: 
  • Where the row is to be added above or below in the cell place the insertion point there itself.
  • Select Table  Insert  Rows Below or Rows Above.  
* To add column: 
  • Where a new column is to be added place the insertion point in the column beside that place.
  • Select Table  Insert  Columns to the Right or Columns to the Left.  
  *  To delete rows: 
  • The row to be deleted place the insertion point there.
  • Select Table  Delete  Rows.  
  *  To delete columns: 
  • The column to be deleted place the insertion point there.
  • Select Table Delete  Columns.

*   Kerning     Word 2003 enables to adjust kerning in your document. Basically it a process of moving letters closer together, in an effort to overcome the illusion too much space between letters. It makes the text more appealing and readable. In Word, kerning can be adjusted either automatically or manually.     * To change kerning automatically: 
  • Select the text and right click to open the popup menu.
  • Click Font to open the Font dialog box, as shown in the following figure:
  • Click the Character Spacing tab and adjust the character spading and positions.
  • Select the Kerning for fonts check box, as shown in the following figure:
  • Click OK.  
    * Working-with WordArt Word Art is the excellent feature of Word 2003. Basically it is an auto shape toolbar in Microsoft Word 2003 that allows creating a variety of three-dimensional word shapes in the document. You can change the text, determine text wrapping points and even modify the orientation of the text.     * To insert the word art: 
  • Select the area of the document where you want to place the word art.
  • Click anywhere inside the document to select a location for the placement of the word art.
  • Click Insert WordArt to open the WordArt gallery.
  • Select the desired word art design.
  • Click Ok to open the Edit WordArt Text dialog box.
  • Type the text and set the font and size.
  • Click OK to apply all effects

*  Paragraph Level Formatting   MS Word enables paragraph formatting that includes text alignment, setting margins and line spacing. While applying formatting it affects the entire paragraph even if a single word is selected or the insertion point is placed in the paragraph.     * To format a paragraph:
  • Select the paragraph/paragraphs to which the formatting has to be applied.
  • Select Format  
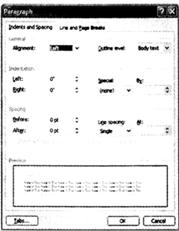
Paragraph to display the Paragraph dialog box, as shown in the following figure:
  • In the General section, set the alignment of the paragraph from the Alignment drop-down list.
  • In the Indentation section, set the left, right and special indents from Left, Right and Special drop-down list.  
  * MS Word also enables the following alternative methods to align the paragraph: 
  • Click Align Left in the formatting toolbar for left aligning the text.
  • Click Center in the formatting toolbar for center aligning the text.
  • Click Align Right in the formatting toolbar for right aligning the text.
  • Click Justify in the formatting toolbar for justifying alignment of the text.
  • Set the spacing before and after the paragraph from the before and after drop-don list. The spacing between each line can be set by selecting a value from the Line spacing drop-down list.
  • Click OK to apply the formatting.  
      Question.jpg      Word 2003 allows setting page setup according to your need. To change the page setup you need to open the Page setup dialog box. Which one of the following is the correct step to open page Setup dialog box? (A) Select File  Page Setup                     (B) Select Format  Page Setup (C) Select Insert  Page Setup                                (D) Select File Print Page Setup (E) None of these     Answer: (a) Explanation Correct Option: (A) Select File  Page Setup to open page setup dialog box. Incorrect Option: Rests of the options are invalid.          Steve's teacher asks him to open Word help and search any query. But his mouse is not working properly. He wants to open Word help using keyboard. Which one of the following short cut keys he should use to open Word Help? (A) F1                                                                      (B) F2 (C) Ctrl +S                                                              (D) F3 (E) None of these     Answer: (A) Explanation Correct Option: (A) While pressing Fl key it opens word help. Incorrect Option: Rests of the options are invalid.          Which of the following steps are true about spell and grammar checker? (A) The spelling and grammar checker can be executed to check the spelling and grammar in the whole document. (B) By default Word checks spelling and grammar as more...

*    Changing Appearance of Text   Word enables to change text according to your requirements. You can set appearance of your document text by applying font, font size, bold and underline.     * To apply font and font size: 
  • Select the text in the document and click Format -> Font to open the Font dialog box, as shown in the following figure.
  • To set the font, select the required font from the Font list.
  • To set the font style, select the required font style from the Font style list.
  • To set the font size, select the required font size from the Size list. v  To set the font colour, select the required font colour from the Font colour dropdown list.
  • The preview of the text can be seen in the Preview section.
  • Click OK to close the Font dialog box and apply the selected formatting to the selected text.  
    * MS Word also enables the/allowing alternative methods that you can used to apply font and font size:
  • Click Font list on the formatting toolbar to select the font, such as Times New Roman.
  • Click Font Size list on the formatting toolbar to select the size of the font, such as 11.
  • Click Font Colour list to define the colour of the selected text  
  * To bold a particular text: 
  • Select text in the document
  • Click Bold or press ctrl + b key.  
  * To underline a particular text: 
  • Select text in the document
  • Click Underline button or press ctrl + u key.  
  *  To apply the Italic on a particular text: 
  • Select text in the document
  • Click Italic or press ctrl + I key.  
  * To apply a particular effect on the text:  Select the check box for the particular effect such as shadow from the Effects section.  


You need to login to perform this action.
You will be redirected in 3 sec spinner