Microsoft Windows
Category : Banking
Microsoft Windows
Introduction
Microsoft Windows is an operating system and GUI (Graphical User Interface) produced by Microsoft, the software company Bill Gates is the Chairman of Microsoft which he founded with a Paul Allen. Nowadays approximately 90%of all personal computer are running of window it was introduced as a GUI that simplified DOS commands and task by a converting program and commands to icon In 1983 Microsoft announced the development of windows, a GUI for its own operating system MS-DOS, which has developed for IBM PC and The fir it independent version of Microsoft Windows, version 1.0, going to be called "Interface Manager" hut Rowland Hudson, the head at because it had new graphical application. Excel and Word. Versions of Microsoft Windows such as 2.OX, 2.03, 3.0 etc. Microsoft Windows 3.0 released in "1990 that scored significant success. In this version Windows
Microsoft Windows 95 - In 1995
Microsoft Windows 98 - In 1998
Microsoft Windows ME - In 2000
Microsoft Windows XP - In 2001
Microsoft Windows Vista - In 2007
Microsoft Windows 7 - In 2009
Microsoft Windows 8 - In 2012
MS-Windows related terms
1. GUI (Graphical User Interface): GUI uses graphics or pictures to help the user navigate and access programs. Graphical user interface allows users to interact with electronic device such as computers, MP3 players, portable media player and gaming device etc. It offers graphical icons, images and visual indicators instead of text commands. There is no need to remember the commands. It provides easy and effective interface between users and electronic devices by direct manipulation of the graphical elements. It is user friendly because it provides easily understood instruction. The Xerox Star was the first commercial computer developed by Xerox Corporation, which uses a graphical user interface with the desktop with icons and a mouse.
2. Icon: Icons are small images on desktop that represent various computer's applications or programs, files, folders, printers and other things. To activate the program or file or folder that an icon represents we have to simply double click on it with the left mouse button. This will activate the icon and either start a program or open a file or folder. By right-clicking we have access to a menu offering options, actions and properties. The icons can be renamed by right clicking on them and selecting rename. They can be deleted by right clicking and selecting delete. The user can put his own icons on the desktop that will quickly access programs or files - like a shortcut. Icons can be moved around on the desktop by clicking and dragging them.
3. Interface: It is technique to communicate or meet two independent system with each other. An interface allow human being to interact with a computer, a telephone system, or other electronic information system. It can be of several types. The user interface allows the user to communicate with the operating system with the help of Keyboard and mouse etc. Languages and codes that the applications use to communicate with each other and with the hardware are called software interface. The hardware interface are wires, plugs and sockets that hardware devices use to communicate with each other. Network interface allows users to communicate between two
Windows Desktop: The desktop is the main screen area that we see after we turn on our computer and log on to Windows. When computer is booted up and ready to use, the screen we see is called the desktop. In other words, it is a screen that comes on when we turn on our computer that shows needed for accessing those programs. Desktops vary from one operating
OS. It is the base for all computer operations. This background graphic of desktop is called Wallpaper. It can be changed to a different pattern or photo or picture by accessing "Display" in the Control Panel. A small arrow or blinking symbol on desktop is called cursor. When programs run on top of the desktop, the desktop itself is often partially or completely hidden.
To see the whole desktop without closing any open programs or windows click the 'Show Desktop button' on the taskbar. The desktop is revealed click the again to so all of your window to the way they were.
Some important graphic features that we will find on a desktop is,-in desktop when we press F5, it refreshes the screen.
Some of the most important icons on the desktop are
1. My Computer: It is an important icon on the desktop which allow to access drives, printers, the Control Panel and other system applications. The applications, such as 'Add New Hardware', 'Add / Remove Programs' and 'Accessibility Options'. From the Control Panel, we can access hardware settings the keyboard, mouse speed, printers and modem; as well as settings for the monitor display and sound. It tells about used and free space available in computers.
2. Recycle Bin: It is another important icon on the desktop. When we delete a file or folder, it goes into the Recycle Bin where it stays until the mistake we can find it in the Recycle Bin and restore it to its proper place. When the Recycle Bin is emptied, everything in it is permanently deleted.
My Network: laces it shows all network connections, which makes possible to connect the computer system from internet.
My Document: it is a location for storing all documents such as text files, spreadsheets, and presentations. It is available on the Start menu, and we can also create a shortcut to it on the desktop for faster access.
Organize the desktop icons
1. Click on the desktop with right button of the mouse.
2. Select on the menu ?Arrange icon by?
3. As the menu is displayed you can choose to organize them by name, type, size or modified (date).
Create a shortcut
1. Click on the desktop with the right button of the mouse.
2. Select the option Shortcut on the new menu. A dialog box will appear so that we can indicate the program for which we want the shortcut created.
3. Click on Browse button, to find the program.
4. Select the desired unit and look for the file or folder you want.
5. After selecting the file or folder click on ok.
6. Click Next.
7. Type a name for the Shortcut.
8. Click Finish.
Taskbar: The taskbar is the long horizontal bar at the bottom of desktop and it is visible almost all the time. It has four main sections.
Ø The Start button, which opens the Start menu.
Ø The Quick Launch Toolbar, which lets start programs with one click.
Ø The middle section, which shows programs and documents we have
Ø The notification area, on the far right side of the taskbar, which includes a clock and icons that communicate the status of certain programs and computer settings.
Ø To do any changes in taskbar we select the setting option in Start Menu then click on 'Taskbar and Start Menu' in sub-menu of setting that opens the 'Taskbar and Start menu Properties'.
Ø 'Taskbar and Start menu Properties' window has several options, which we select upon own choice.
1. Lock the Taskbar: We can keep the taskbar in one place by locking it move it to the bottom, side, or top of the desktop. Right-click an empty space on the taskbar, and if 'Lock the Taskbar 'has a check mark next to it, the taskbar is locked. If it does not have a check mark, click on 'Lock the Taskbar' to lock the taskbar.
2. Auto-hide the Taskbar: The taskbar is usually located at the bottom of your screen. We can hide the taskbar to create more space. To hide the taskbar click to open 'Taskbar and Start menu Properties'. Clear the 'Lock the taskbar' check box. Select the 'Auto-hide the taskbar' check box .If we don't see the taskbar anywhere on the screen, it might be hidden. If the taskbar is hidden, point to where we last saw it to show it again. If we can't remember where we last saw it, try pointing to the bottom of the screen first, and then to the side or top of the screen, if necessary.
3. Keep the taskbar on top of the window: If selected, make sure the taskbar is visible at all times, even when large maximized program window are covering the rest of the screen.
4. Group similar task bar button: if selected, allow multiple taskbar buttons to collapse into a single button so the buttons don't become too small to see on the taskbar.
Show Quick Launch; if selected, display the optional Quick Launch toolbar to the right of the Start button.
5. Show the clock: If selected, display clock on right side of the taskbar:
6. Hide interactive icon: task bar if selected, hide the buttons which is not currently used.
Start Menu
At the edge of the screen usually the bottom, we see a long, thin bar with a box labeled "Start" on one end and a clock on the other end. If we click on the "Start" button, a box called a start menu will appear. It is the main gateway to computer's programs, folders, and settings. It's called a menu because it provides a list of choices. Some choices have small arrows next to them which access other menus. The Start Menu can be personalized by adding and removing programs, files and folders.
Start Menu has the following options
Program: It is a list of installed programs, we can access the installed programs from here. If we install a new program, it is typically added to the program menu.
Favorites: It is a list of book-marked web pages, we can access book-marked web pages from here.
Document: It is a list of most recently opened documents, we can access the most recently opened documents from here.
Settings: It is a list of system applications, we can access system applications such as Control Panel, printers, taskbar and Start Menu options from here.
Find: Searches for specific files or folders.
Help: Offers helpful topics related to computer and program.
Run: User can input commands to run specific programs or open any File, folder and document.
Log off Allow password: Protected user to log off and another to logon.
Turn off or Shut Down: Shuts down or restarts the computer.
Title Bar
Most of the programs, data or information and applications run within a rectangular area that is a window. The horizontal bar at the top of a window that contains the name of the window are called title bar. Most title bars also contain three control buttons in the far right hand side. These buttons are Minimize, Maximize/Restore and Close.
The left first button in minimize button that is visually respected by sign ![]() . Minimizing the window clears it from the screen and application will be too reduced to an icon on the task bar butt keeps the program running. A raised button on taskbar indicates a minimized or inactive window, and a depressed button indicates an open or active window. Minimizing a window is helpful if the user is temporarily not using the program, but plans to return to it soon. To redisplay the minimized 'Window, click on the button on the taskbar.
. Minimizing the window clears it from the screen and application will be too reduced to an icon on the task bar butt keeps the program running. A raised button on taskbar indicates a minimized or inactive window, and a depressed button indicates an open or active window. Minimizing a window is helpful if the user is temporarily not using the program, but plans to return to it soon. To redisplay the minimized 'Window, click on the button on the taskbar.
The middle control button in this maximization button that is visually represented by ![]() or
or ![]() two small boxes on it. When we click on it, it controls the size of the window display. Restore reduces the window to a smaller size on the desktop. Maximize resize the window to full screen or expand it to fit the screen.
two small boxes on it. When we click on it, it controls the size of the window display. Restore reduces the window to a smaller size on the desktop. Maximize resize the window to full screen or expand it to fit the screen.
The far right control button in these is Close button and is visually represented by![]() . It closes the window, which also doses the program. In MS-Word, if we have not saved our most recent edits, the system will prompt to save when we click on it.
. It closes the window, which also doses the program. In MS-Word, if we have not saved our most recent edits, the system will prompt to save when we click on it.
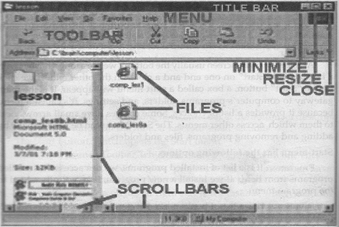
Scroll Bar
When a document, webpage, or picture exceeds the size of its window, scroll bars appear to allow to see the information that is currently out of view. It appears at right side and bottom of window, which are called horizontal and vertical scroll bars. It has an arrow on both ends and a box in the middle that we use with the help of mouse to move the pages up and down.
We click the up or down scroll arrows to scroll the window's contents up or down in small steps and hold down the mouse button to scroll continuously. When click an empty area of a scroll bar above or below the scroll box to scroll up or down one page and drag a scroll box up, down, left, or right to scroll the window in that direction. To move down, up, right and left a page in a document we use scroll bar.
Menu Bar
In the Windows operating system, each window contains its own menu that contains commands which perform specific actions when they have been selected. It is found just under the title bar and menu contains several choices that will access drop-down menus of options and actions. The menus of menu bar vary from one program to another.
There are some main options of menu bar
1. File Menu: It contains options like new, open, close, save, save as send and print etc.
2. Edit Menu: It contains options like undo, cut, copy, paste and clear etc.
3. View Menu: It contains options for changing things appear on the screen such as Normal, Print Layout, and Toolbar etc.
4. Insert Menu: It contains options like Header, Footer etc.
5. Help Menu: It contains options to access tutorials or helpful information.
Types of Menu Generally menu is two types-
1. Pull-Down Menu: It is also called drop-down menu. It is a menu of options that appear just below the menu bar which we access by clicking with mouse. Fields with a drop-down menu have a small downward- pointing arrow next to them. We click the arrow and a list of options appears. We select the option which we want from the list. We can also open the drop- down menu by holding down the Alt key and pressing the down arrow we can use the arrow keys to move up and down in a drop-down menu. We can also move to an item by typing the first few letters of the option. Some commands are faded or dimmed means the command is not currently accessible.
2. Pull-up Menu: It is also a menu of options that appears just up of option which we select with mouse. Any option of menu can open by clicking a mouse or pressing Ctrl key with underline letter of that option. Some options have symbols such as?
1. Triangle\[(\Delta )\]: A small triangle in right side of command indicates that has another submenu and after clicking on it opens another submenu.
2. Ellipses (...): It indicates that command needs additional information. So by using this command a dialog box appears for selecting or inputting
3. Dot (.): It appears at the left side of option, which indicates that only one option can be selected.
4. Check Mark (√): It appears at the left side of active options. Its boxes allow to select one or more options at the same time.
5. Gray option: If any command is currently inactive, unavailable and cannot be clicked, it is shown in gray or light color.
Toolbar
Under the Menu bar, we will often find a toolbar. It is a bar of command icon that allow us to perform specific task within program. For example in WordPad, the toolbar contains buttons which we can click to apply bold formatting to text, print a file, or open a new document etc. The toolbar buttons provide shortcuts to common tasks frequently accessed from the menus.
Shortcut Keys
It has written in front of commands it provides as easier and usually quicker method of navigating and using programs. Shortcut keys enable the user to select a command without using the menus. Shortcut keys generally combine the Alt, Ctrl or Shift key with a letter key. If a shortcut key is available, it is listed on the pull-down menu to the right of the command. As example to open a file or folder we have to press 'Ctrl+0' and save the file 'Ctrl+S' etc. as shortcut keys.
Dialog Box
Dialog box is a small, secondary window that contains options and buttons for completing a task. For example, when the user saves a file first and close button.
Elements of dialog box
These are the elements of dialog box.
1. OK button: When clicking on the OK button, save the settings or carry out the commands specified in the dialog box and close the dialog box.

2. Cancel button: When clicking on the Cancel button, close the dialog box and restore the settings in the dialog box to the state they were in when the dialog box was opened.
3. Apply button: Use the Apply button to carry out the changes users specify in the dialog box without closing the dialog box.
4. Tabs: in some dialog boxes option are divided into two or more tabs represent multiple pages of a dialog box. Only one tab, or set of options, can be viewed at a time. Choosing a tab changes the options that appear in the dialog box.
5. Option button: Option buttons present a group of related choices from which we can choose only one. Simply click on the option button which want to select, and all other become deselected
6. Check box: Check boxes present a single option or group of related options. A check mark appears in the box next to an option to indicate that it is active.

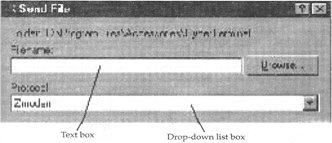
7. Combo box: It is a combination of a drop-down list or list box and a single-line text box, allowing the user to either type a value directly into the control or choose from the list of exiting option
8. Text box: A text box to allow to type information such as a term password name for a file which we want to file or a path we want to use to and find a specific file. A banking vertical line called the curser indicates where text that we type will appear find a specific file. A Sinking vertical line called the cursor indicates where text that we type appear.
9. Drop-Down list box: This box is a single line list box line box with a down arrow button to the right of it. When you click on the arrow, the drop-down list box opens to display a list of choices. We choose a choice. When closed, a drop-down list shows only the currently selected choice. The other available choices are hidden until we click the control.
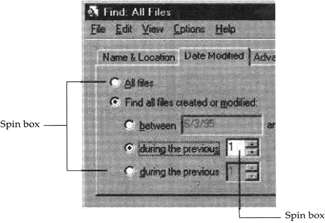
10. Spin box: A text box with a set of arrow button on the right side that can be used to select one of a range of options. The user may type into the down arrow to decrement a value. We can also type the value directly into.
11. Group box: Group box is rectangular box with optional labels. It is a group of related controls such as option buttons, check boxes, or closely related contents into one visual unit.
12. Slider: A slider is a way to adjust a setting within a range of values, such as from slow to fast, small to large, soft to loud etc. Simply hold down the mouse button on the lever and move it in the desired direction. A slider along the bar shows the currently selected value.
Help in windows: Help and Support is the built-in help open Windows Help and Support, click the Start button, and then click Help ' and Support option. The fastest way to get help is to type a word or two in the search box. For example, to get information about wireless networking, type wireless network, and then press ENTER. A list of results appears, with the most useful results shown at the top.
To change the date and time in computer system: To change the date and time in computer system right-click on a clock located on the right side of the task bar. This is commonly in the bottom right hand of taskbar. Then click the Adjust Date/Time menu item. This will open the Date/Time Properties window.in this we can adjust the time date and time zone the proper date and time zone once the proper date and time has been set, click apply and then OK.
To Change the desktop appearance and the background: We can change the general look of desktop by changing the desktop appearance and background. To open the 'Display property' dialog box area of desktop, and then click Properties. After changing click .Apply to test a changes. If we don't like to change any settings click Cancel, and return. After that click OK to close the Display Properties dialog box. There are following options in display property window-
1. Theme: Theme is a collection of visual elements and sounds for computer desktop. A theme determines the look of the various visual include sounds.
2. Desktop background: Desktop background is also called wallpaper. It can be a digital picture from personal collection or one that comes with and we can also select a color for over desktop background or use a color to frame our background picture
3. Screen saver: A moving picture or pattern that appears on a computer screen when the mouse or keyboard has not been used for a specified period time.
4. Appearance: It fine-tunes the color and style of our window. It provides more potential customizations into one area than any other in Window between the Windows and Buttons, Color Scheme, and Fonts etc.
5. Settings: Using this option we adjust over monitor resolution which change the view so more or fewer item fit on the screen we can also control monitor refresh rate.
Window Explorer: the explorer is necessary tool in an operating system since with it we can organize and control the file and folder of the different storage system such as the hard drive dick etc.
To start the Windows Explorer
1. Click on 'Start'
2. Select 'All programs'
3. Select 'Accessories'
4. Select 'Windows Explorer'
The explorer consists basically of two sections. On the left side there is the directory tree, which is the list of units and folders that we have. On the right side there is another section, which will show the content of the folder that we have opened on the left section. This section shows its folders and files Windows Explorer is also known as the 'File Manager'. Through it we can delete, see, copy, or move files and folders. A file is text documents, can create to store group of files. Computer represents files and folder with icon each folder has facility to open explorer search WinZip cut, copy delete rename and create shortcut. Files are organization by storing them in folder
1. Open: Opening a file or folder is needed to editing, viewing, printing, and sharing information. First find the file or folder that we want to open. Then double-click the file or folder to open double click a file automatically opens its associates programs
2. Explore: Explore displays the hierarchical structure of files, folders and drives on computer.
3. Search: When we need to find a particular file, we will know that it is located somewhere in a common folder like Documents or Pictures etc. Search box is located at the top of every folder. To find a file, open the folder that contains the file, click the Search box, and start type of that file or part of file name the Search box filters the current view based on the text that typed. Files are displayed as search results if search term matches the file's name
4. WinZip: Compressed files take up less storage space and can be compress a file locate the file or folder that we want to compress. Right-click the file or folder then click on WinZip option. A new compressed folder is created. To rename it, right-click the folder, click Rename, and then type the new name
5. Cut and Paste: This option is used to store the file any other places. Cut is a command used to remove text graphics and files and it is then stored on a clipboard so we can paste it.
6. Delete: To delete locate a file or folder that we want to delete. Right- click the file or folder then click Delete. When we delete a file or folder, it is j not deleted right away. Instead, it is stored in the Recycle Bin and we can get the deleted file by using Restore option in Recycle Bin until the Recycle Bin is emptied.
7. Rename: Using it we give a new name to a file. To rename a file, we do not need to open the file. Right-click the file that we want to rename, and then click Rename. Type the new name, and then press ENTER.
8. Properties: Properties are descriptive information that help us to find and organize files. To view the properties of any file and folder Right-click the file whose properties we want to see, and then click Properties. They provide information such as type, location, size, created date and many other properties of files. There are two more option
(a) Read only: Setting a file to read-only helps to protect the file from Accidental deletion and changes to the file's content. If a file is set to read only, we will not be able to save changes to it unless we turn off the files read-only status.
(b) Hidden: Setting a file to hidden it shows in tree view in a system running Windows XP, to conserve power we actually have three choices: shutdown hibernate, and standby
Standby: Standby drops the computer into a very low power mode. This mode saves significant electrical consumption compared to leaving a device fully on and idle but allow the user to avoid having to reset programming codes or wait for a machine to reboot. When the system placed in this mode aside from the RAM which is required to restore the machine's state, the computer attempts to cut power to all unneeded parts of the machine. Because of the large power savings, most laptops automatically enter this mode when the computer is running on batteries and the lid is closed. The display turns off, the disk drive stops spinning, and the processor shuts down almost completely in standby power is used manually to keep the contents random access memory refreshed.
Herbert: It is a feature of many computer operating systems where the contents of RAM are written to non-volatile storage such as a hard disk, before powering off the computer. When the computer is restarted it reloads the content of memory and is restored to the state it was in when hibernation was invoked. While starting from a hibernated state is usually quicker than starting up and opening all applications, it still requires a few seconds or more, depending on the system's general speed.
Shutdown: It turn a machine off. To shutdown check that if any users are currently on the system. If they are, ask them to log off. Once all of the users are logged off of the system, we may execute the 'shutdown' command.
Useful programs inside window
1. Notepad: Notepad is a basic text editing program and it is most commonly used to view or edit text files. A text file is a file type typically identified by the text file name extension.
To open a notepad: Click Start Programs Accessories Notepad
2. Word Pad: Word Pad is a text-editing program and we can use to create and edit documents. Unlike Note pad. Word pad documents can include complex formatting and graphics such as pictures or other documents
To open a Word Pad: Click Start Programs Accessories Word pad.
3. Paint: Paint is a drawing program that we can use to create drawings or edit digital pictures. We can also use Paint to save picture files using different file formats.
To open a Paint: Click Start Programs Accessories Paint
4. Calculator: We can use Calculator to perform addition, subtraction, multiplication, and division. Calculator also offers the advanced capabilities of scientific and statistical calculators.
Click Start >> Programs >> Accessories Calculator.
5. Phone Dialer
To open a phone dialer:
Click Start>> Programs >> Accessories >> phone dialer
6. Imaging: To open an imaging:
Click Start >> Programs >> Accessories >> Scanner and Camera wizard.
7. Media Player: Windows Media Player provides an easy-to-use interface to play digital media files, organize digital media collection, burn CDs of favorite music, and rip music from CDs etc.
To open a Media Player: Click Start >> Programs >> Accessories >> Entertainment >> Media Player
8. CD Player: Using this we can use our computer system as a powerful to open a CD player: Click Start >> Programs >> Accessories >> Entertainment >> CD player
9. Sound recorder and Volume control -Using Sound Recorder, we can record sound as a digital media file on computer from a variety of devices, such as a microphone that is plugged in to sound card.
To open a Sound recorder: Click Start >> Programs >> Accessories >> Entertainment >> Sound recorder
We can control the overall level of sound using Windows.
To open a Volume control: Click Start >> Programs >> Accessories >> Entertainment >> Volume control
10. Game: Windows comes with a small set of games that we can play.
To open a Game: Click Start >> Programs >> Accessories >> Entertainment >> Game
11. Clipboard: The Clipboard is a temporary storage area for information that we have copied or moved from one place to somewhere else. We can select text or graphics and then use the Cut or Copy commands to move our selection to the Clipboard, where it will be stored until we use the Paste command to insert it elsewhere.


You need to login to perform this action.
You will be redirected in
3 sec

