Working with Word Processing 2013
Category : 6th Class
Working with Word Processing 2013
Introduction
Microsoft word 2013 is a word processing program that is used to create professional - looking documents such as reports, resumes, letters, memos and newsletters.
By using Word, it is easy to efficiently create a wide range of business and personal documents, from the simplest letter to the most complex report. Word includes many desktop publishing features that you can use to enhance the appearance of documents so that they are visually appealing and easy to read.
Using MS-Word you can performs that following functions:
v Create professional looking documents.
v Change selection preferences.
v Customize Auto Correct.
v Learn how well you can write (technically).
v Make comments and suggestions.
v Spelling and Grammar check in a document.
v Inserting picture in a document.
v Inserting table and chart in a document.
Starting MS-Word
To start MS-Word, follow the following steps:
v Click start button.
v Select All Apps.
v Click Microsoft Office 2013 and select Word 2013.
Or
v Type the 'winword', in cortana in 'type here to search' box.
MS-Word Windows 2013
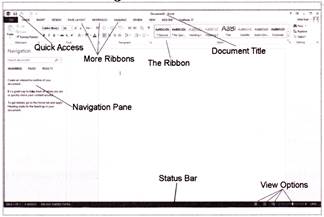
Features of MS-Word 2013
Title bar ![]()
This bar is located at the top of the window and displays the name of the document which is active.
Minimize Button ![]()
This button is located on the upper right corner of the window. It is the first button of existing three buttons.
Maximize/Restore ![]()
This button is also located on the upper right corner of the window. It is the second button of existing three buttons. It basically changes the size of the window.
Document Close Button ![]()
This button is located on the upper right corner of the window. It is the third button of existing three buttons. It is basically used for closing the document on window.
Menu Bar ![]()
It is the list of main menu choices located below the title bar.
Scroll Bar ![]()
It allows scrolling the document up and down or from left to right. There are two types of scroll bar: vertical and horizontal.
Status Bar ![]()
It displays information about the active document, such as current line number, column number or page number. It is located across the bottom of the application window.
Text Area
The place where you enter your text document is referred as Text Area. The text area of a document in print layout preview is bounded with both vertical and horizontal rulers, horizontal and vertical scroll bars.
Formatting MS-Word Document Tools
Word 2013 includes Font, Font size, Font color, and Font style and effect. The Font group on the Home tab of the Ribbon contains the most commonly used text formatting commands.
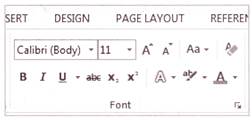
Formatting of word document includes
v Font
v Font style
v Size
v Font color
v Underline style
v Underline color
v Effects
To apply any formatting option on text do the following:
v Select the text in the document.
v Select Home tab à font group.
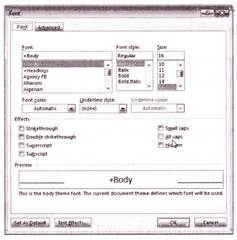
Font dialog box can be opened by clicking the dialog box launcher in the font group.
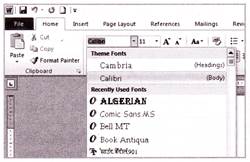
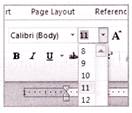
Font
To apply different font, follow the following steps:
v Select the text that you want to format.
v On the font option select the desired font from the list.
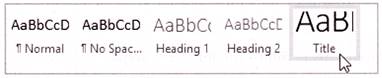
Font Style
To apply different font style, follow the following steps:
v Select the text that you want to format.
v On the font style option, select the desired font from the list.
Size
To apply different font size, follow the following steps:
v Select the text for which you want to change the size.
v Select the size.
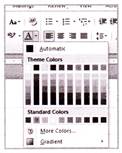
Font Color
To apply different font colors, follow the following steps:
v Select the text on which you want to apply color.
v Select the color from font color.
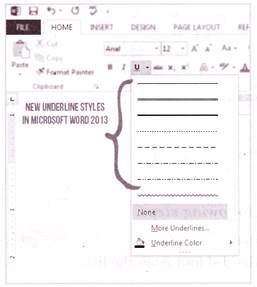
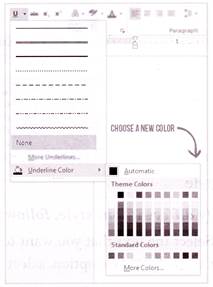
Underline style and Underline Color
To apply different underline style and underline color, follow the following steps:
v Select the text on which you want to apply underline with underline color.
v Select the underline style with underline color option.
Effects
To apply different effects follow the following steps:
v Select the text on which you want to apply different effects. Effects list is a follows:
|
Action |
Purpose |
|
Strike through |
It strikes the word. (Computers) |
|
Double strike through |
It double strikes the word. (Computers) |
|
Super script |
It positions number or text slightly higher than the text on the line. |
|
Sub script |
It positions number or text slightly lower than the text on the line. |
|
Small caps |
It capitalize letters. |
|
All Caps |
It capitalize all letters. |
|
Hidden |
If you have confidential information in a document or text that you do not want others to see you can hide the text. |
Some other options in the group:
|
Symbol |
Name |
Purpose |
|
|
Font |
It apply different font on selected text to you text. |
|
|
Size |
It makes the selected text size increase or decrease. |
|
|
Increase Font Size |
It makes the selected text size increase. |
|
|
Decrease Font Size |
It makes the selected text to you text. |
|
|
Change Case |
Change the selected text in: Upper Case: Example (COMPUTER). Lower Case: Example (computer). Sentence case: example (computer is an electronic machine Capitalize Each word: example (computer is a electronic machine ) tOGGLE Case: Example (cOMPUTER iS aN eLECTRONIC mACHINE). |
|
|
Clear formatting |
It clear, all the formatting you applied on selected text and makes your selected text in normal format. |
|
B |
Bold |
It makes the selected text bold. Example COMPUTER. |
|
I |
Italic |
It makes the selected text italic. Example COMPUTER. |
|
U |
Underline |
It underlines the selected text. Example computer |
|
abc |
Strike though |
It strikes and places letters or numbers the word. Example COMPUTER |
|
X2 |
Sub-script |
It makes the slightly lower than the text on line. |
|
X2 |
Super-script |
It makes the slightly higher than the text on line. |
|
|
Text effected and typography |
It applies the Text effect on selected text in the form of Outline, Shadow Reflection, Glow. |
|
|
Text highlighting |
It makes the selected text as highlighted. |
|
|
Front color |
It applies the different color on selected text. |
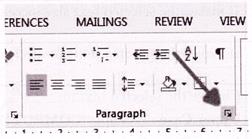
Paragraph
Paragraph is a collection of words and sentences. Paragraph formatting involves text, alignment, setting margins and line spacing. To apply formatting option the text should be selected.
Bullets
Microsoft word enables the feature to insert bullet and number list in a document.
v To insert a bulleted list, Select the text and click the Bulleted List button on the Ribbon.
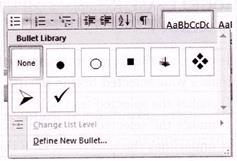
v To insert a numbered list, select the text and click the Numbered List button on the Ribbon.
v You can also change the bullet image and numbering format using the Bullets and Numbering dialog box.
To change the bullet image and numbering format:
v Select Home tab > Paragraph group > Bullets and Numbering or right-clicking within the list and select Bullets and Numbering from the shortcut menu to display the Bullets and Numbering dialog box.
v To select a bullet style, click the Bulleted tab. Select the list style from one of the seven choices given or click Picture to choose a different icon. Click Numbered tab to choose a numbered list style.
v Click OK.
Increase/Decrease Indent
It is used to set the margin from left and right side.
v Click the ![]() increase indent button in the paragraph group on the Home Tab to increase the indent.
increase indent button in the paragraph group on the Home Tab to increase the indent.
v Click the ![]() Decrease indent button in the paragraph on the Home Tab to decrease the indent.
Decrease indent button in the paragraph on the Home Tab to decrease the indent.
Paragraph Alignment
The Paragraph alignment option is used to align each line of the paragraph.
v Align left ![]() : Aligns the text at the left margin. The shortcut key of left align is Ctrl+L.
: Aligns the text at the left margin. The shortcut key of left align is Ctrl+L.
v Center ![]() : Centers the text between the left and center margin. The shortcut of center align is Ctrl+E.
: Centers the text between the left and center margin. The shortcut of center align is Ctrl+E.
v Alight Right![]() : Aligns the text at the right margin. The shortcut of right align is Ctrl+R.
: Aligns the text at the right margin. The shortcut of right align is Ctrl+R.
v Align Justify ![]() : Aligns the text at both left and right margins. The shortcut of justify align is ctrl+J
: Aligns the text at both left and right margins. The shortcut of justify align is ctrl+J
Line Spacing
![]() Line spacing option is used to set the space between the lines of text in a paragraph. In word 2013, the default spacing is 1.08 line and 8 points after each paragraph.
Line spacing option is used to set the space between the lines of text in a paragraph. In word 2013, the default spacing is 1.08 line and 8 points after each paragraph.
Steps to apply line spacing
v Select the text or paragraph on which you want to apply line spacing.
v Click on home tab and select line space from paragraph group.
v Select the desired line spacing from drop down list.
Find and Replace
MS-Word offers several options for locating specific content in your document. You can search for it and replace items in it such as text, images or paragraphs.
Steps to use 'Find' command in MS-Word 2013:
Find feature is very useful to search for a particular word or phrase through lengthy documents.
v On the Home tab select Find option from editing group.
v On the left hand side, in navigation pane, type any word which you want to search from the current document.
v Now the search word is shown highlighted.
Steps to use 'Replace' command in MS-Word 2013:
The Replace command is used to replace any particular word within a document. This feature is very useful when you have made a mistake repeatedly throughout your document.
v On the Home tab select Replace option from editing group.
v The replace dialog box will appear on your screen.
v In Find What: type any word which you to want replace.
v In Replace With: type the word which you want to replace with existing word.
v Click Replace button to replace or click Replace All button to replace all the word with that word.
Shortcut Keys in MS-Word 2013
|
Shortcut |
Description |
|
Ctrl + N |
Open new word document |
|
Ctrl + A |
Select all contents in the word document |
|
Ctrl + C |
Copy the selected content |
|
Ctrl + X |
Cut the selected content |
|
Ctrl + V |
Paste the selected content |
|
Ctrl + B |
Bold highlighted selection |
|
Ctrl + I |
Italic highlighted selection |
|
Ctrl + U |
Underline highlighted selection |
|
Ctrl + S |
Save the open document |
|
Ctrl + P |
Open print dialog box |
|
Ctrl + Z |
Undo last action |
|
Ctrl + L |
Left Alignment |
|
Ctrl + E |
Centre Alignment |
|
Ctrl + R |
Right Alignment |
|
Ctrl + J |
Justify Alignment. This will align the document equally from both side |
|
Ctrl + D |
Open Font dialog box |
|
Ctrl + Page up |
Move up one by one page |
|
Ctrl + Page down |
Move down one by one page |
|
Ctrl + Home |
Move to the beginning of the document |
|
Shortcut |
Description |
|
Ctrl + End |
Move to the end of the document |
|
Ctrl + [ |
Decrease Font size of the selected word |
|
Ctrl + ] |
Increase Font size of the selected word |
|
Ctrl - = |
Subscript_ |
|
Ctrl + Shift + + |
Superscript |
|
Down Arrow or Enter |
Move downward, one line at a time |
|
Up Arrow |
Move upward, one line at a time |
|
Right Arrow Left Arrow |
Move to right side one by one word Move to left side one by one word |
|
Page up |
Move up, one page at a time |
|
Page down |
Move down one page at a time |
|
Ctrl + Down Arrow |
Move in downward direction line by line |
|
Ctrl + up Arrow |
Move in upward direction line by line |
|
Ctrl + Right Arrow |
Move to next word in a row to right side |
|
Ctrl + Left Arrow |
Move to next word in a row to left side |
|
Backspace |
Delete character to the left of the cursor |
|
F1 |
Help |
|
F5 |
Go to page number dialogue box will be opened |
|
F6 |
Navigation (containing Headings, Pages and Results will be displayed based on search criteria in search box) |
|
F7 |
Spell check |
|
F 12 |
Save As |
|
Alt + F4 |
Close open document |
|
|
Note: F means function key |


You need to login to perform this action.
You will be redirected in
3 sec

