GEOMETRY
Category : 6th Class
Learning Objective
POINT
A point determines a location. A point has no dimensions i.e. no shape or size.
For example:
(i) The sharpened end of a pencil.
(ii) Tip of a needle.
LINE
A line is a straight path that extends indefinitely in both directions. It has no end points.
For example: The line is named as \[\overleftrightarrow{AB}\] and read as line AB.
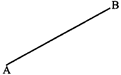
LINE SEGMENT
A line segment is a portion of a line with two fixed end points.
For example:
(i) An edge of a box.
(ii) ![]()
This is a line segment named as AB and read as line segment AB.
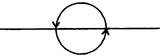
INTERSECTING LINES
If two or more lines meet each other at one point then they are called intersecting lines.
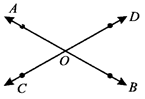
AB and CD are intersecting lines and 0 is the point of intersection
PARALLEL LINES
If two or more lines do not meet each other, whenever they are extended, then they are called parallel lines.
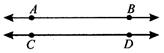
AB is parallel to CD
CONCURRENT LINES
If three or more lines pass through a point, then they are called concurrent lines and the point through which these all lines pass is called point of concurrent.

TRANSVERSAL
A line which intersects two or more given lines at distinct points is called a transversal of the given lines.
For example

Here line \['\ell '\] is transversal of lines 'm' and 'n'
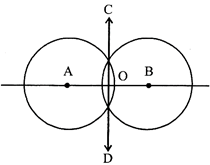
PERPENDICULAR LINES
Perpendicular lines are two lines that intersect each other at a right angle.
For example:
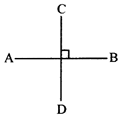
A line AB placed horizontally and line CD placed vertically to AB as shown in above figure.
ANGLES
Two rays with a common initial point form an angle.
The space within the arms of an angle, produced indefinitely, is called the interior of the angle.
The space outside the arms of an angle, produced indefinitely, is called the exterior of the angle.
Two angles which have a common arm, a common vertex, and lie on either side of the common arm are called adjacent angles.
Here \[\angle \,AOB\] and \[\angle \,BOC\] are adjacent angles.

TYPES OF ANGLES
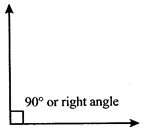
Right angle
An angle of magnitude exactly 90° is called a right angle.
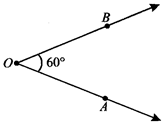
Acute angle
An angle of magnitude less than 90° is called an acute angle
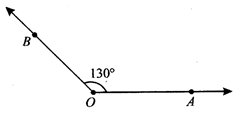
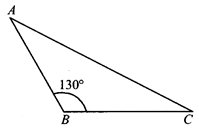
Obtuse angle
An angle of magnitude more than 90° and less than 180° is called an obtuse angle.
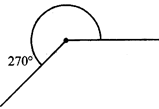
Reflex angle
An angle of magnitude more than 180° and less than 360° is called a reflex angle.
Complete angle
An angle of magnitude exactly 360° is called a complete angle.
TRIANGLE
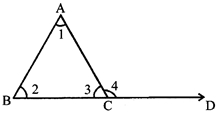
\[\Rightarrow \,\,\,\,\angle 1+\angle 2+\angle 3\,={{180}^{\text{o}}}\]
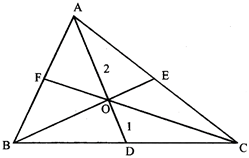
MEDIAN
The line segment joining a vertex of a triangle to the mid-point of the opposite side is called a median of the triangle.
(i) Intersecting point of the medians is called the centroid of the triangle.
(ii) Centroid divide the median in the ratio 2:1.
AD is the median \[\Rightarrow \]BD = CD
(median bisect opposite side)
AD, BE and CF are medians \[\Rightarrow \] O is centroid O divide AD in the ratio 2 : 1.
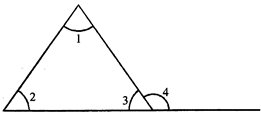
i.e., \[\angle 4=\angle 1+\angle 2\]
TYPES OF TRIANGLE BASED ON SIDES
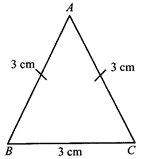
Equilateral Triangle
When all the three sides of a triangle are equal then, it is called an equilateral triangle.
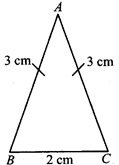
Isosceles Triangle
If two sides of a triangle are equal in length, then it is called an isosceles triangle.
Scalene Triangle
A triangle having no two sides equal, is called a scalene triangle.

TYPES OF TMANGLES BASED ON MAGNITUDE OF THE ANGLES
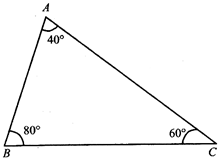
Acute-Angled Triangle
If each of the three angles of a triangle are acute i.e less than 90°, then it is called an acute-angled triangle
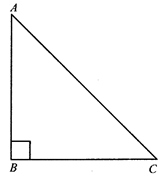
Right-Angled Triangle
When one angle of a triangle is a right angle i.e equal to 90°, then the triangle is called a right-angled triangle,
Obtuse-Angled Triangle
When one of the angles of a triangle is obtuse, i.e., greater than 90°, then it is called an obtuse angled triangle.
QUADRILATERALS A
quadrilateral is a plane figure bounded by four straight lines. The straight line which joins the opposite angular points in a quadrilateral is called diagonal of quadrilateral. In figure PQRS is a quadrilateral and PR, QS are its diagonals. Sum of all angles of a quadrilateral = 360°
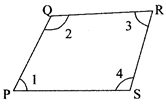
i.e., \[\angle P+\angle Q+\angle R+\angle S={{360}^{\text{o}}}\] \[\angle 1+\angle 2+\angle 3+\angle 4={{360}^{\text{o}}}\]
TYPES OF QUADRILATERALS
Parallelogram
A parallelogram is a quadrilateral with opposite sides parallel and equal.
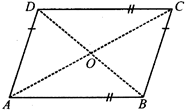
In figure, ABCD is a parallelogram with AC and BD as diagonals which intersect each other at O.
A parallelogram has the following properties
(i) AB= CD and AD=BC
(ii) AB || DC and AD || BC
(iii) \[\angle BAD=\angle BCD\] and \[\angle ABC=\angle ADC\]
(iv) Diagonals AC and DB bisect each other.
(v) Sum of pair of consecutive angles is 180° i.e.,
\[\angle A+\angle B={{180}^{\text{o}}},\,\angle B+\angle C={{180}^{\text{o}}}\]
\[\angle C+\angle D={{180}^{\text{o}}},\,\angle D=\angle A={{180}^{\text{o}}}\]
Rectangle
A parallelogram is a rectangle if its all angles are equal to 90°.

In figure \[\angle A=\angle B=\angle C=\angle D={{90}^{\text{o}}}\]
(i) In a rectangle
Length of diagonal, \[AC=\sqrt{A{{B}^{2}}+B{{C}^{2}}}\]
\[l=\sqrt{{{b}^{2}}+{{h}^{2}}}\] [By Pythagoras Theorem]
(ii) In a rectangle diagonals are equal and bisect each other.
(iii) All rectangles are parallelogram but all parallelograms are not rectangles.
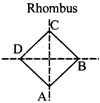
Rhombus
A parallelogram is a rhombus if its all sides are equal.
(i) In a rhombus diagonals bisect each other at right angles i.e. angle between AC and DB is 90°.
(ii) All rhombuses are parallelogram but all parallelograms are not rhombus.
(iii) Area of rhombus \[=\frac{1}{2}\times \] product of lengths of diagonals.
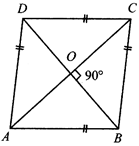
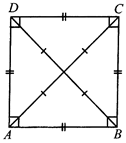
Square
A parallelogram is a square if all the four sides are equal and also all the four angles are equal (i.e. 90° each)
(i) In a square diagonals are equal.
(ii) In a square diagonals bisect each other at 90°.
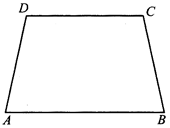
Trapezium
A quadrilateral is a trapezium if one pair of opposite side is parallel.
In quadrilateral ABCD given in figure AB||CD, hence ABCD is a trapezium.
If lateral sides of a trapezium are equal then it is called isosceles trapezium. In an isosceles trapezium ABCD,
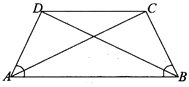
(i) AD=BC
(ii) AB || DC.
(iii) Base angles are equal \[(\angle A=\angle B)\].
(iv) Diagonals are equal \[(AC=BD)\].
Diagonal Properties of all Parallelograms
| Sr. No. | Diagonal Properties | Type of Parallelogram | |||
| Parallelogram | Rectangle | Rhombus | Square | ||
| 1. | Diagonals bisect each other | Ö | Ö | Ö | Ö |
| 2. | Diagonals are equal | \[\times \] | Ö | \[\times \] | Ö |
| 3. | Diagonals are at \[{{90}^{\text{o}}}\] to each other | \[\times \] | \[\times \] | Ö | Ö |
CIRCLE
They remain constant.
For example: shapes of wheels, coins etc.
PARTS OF A CIRCLE
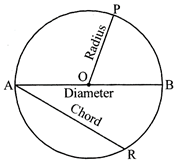
The fixed point in the plane which is equidistant from every point on the boundary of the circle is called centre. In the adjoining figure, O is the centre of the circle.
The fixed distance between the centre and any point of the circle is called radius. In figure, \[\overline{OP}\] is a radius.
A line segment joining any two points on a circle is called a chord of the circle. In figure. \[\overline{AR}\] is a chord.
A chord that passes through the centre of a circle is called diameter of the circle. In figure, \[\overline{AB}\] is a diameter. The length of a diameter = 2 x radius. In a circle, diameter is the longest chord.
The distance around a circle is called the circumference. Circumference of a circle is the perimeter of that circle.
A part of a circumference is called an arc. In the above figure, the curve line AR is an arc of the circle. It is written as \[\overline{AR}\].
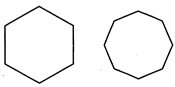
POLYGONS
A polygon is a closed figure made by joining three or more line segments (not curves), where each line segment intersects exactly two other line segments.
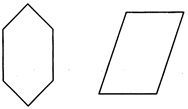
A polygon is a closed figure made by joining line segments, where each line segment intersects exactly two other line segments.
A regular polygon is a polygon in which all the sides are equal and all the angles are equal
The following figures are examples of irregular polygons.

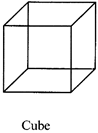
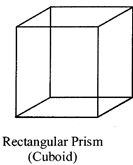
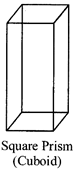
PRISMS
Cube, cuboid, triangular prism, square prism are a few examples of prisms. We can have hexagonal, octagonal, or decagonal prism. The prisms are named according to the number of sides of the base. They all have rectangular surfaces as part of lateral surface.

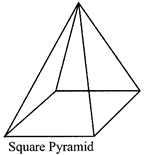
PYRAMIDS
There are triangular pyramid, square pyramid, rectangular pyramid, pentagonal pyramid, hexagonal pyramid, and so on. Again, they are named by the number of sides of the base. They all have triangular surfaces meeting at a vertex.
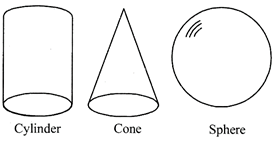
SOLID WITH CURVED SURFACES
Cylinder, cone, sphere.
ANGLES IN TERMS OF REVOLUTION
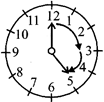
Express the angles in terms of a revolution on clock faces.
The movement of the minute hand from 12 to 12 is given as:
(i) From 12 to 3, it turns through one right angle i.e. 90° and \[\frac{1}{4}\] of a revolution.
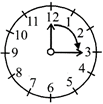
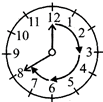
(ii) From 12 to 6, it turns through two right angles i.e. 180° and \[\frac{1}{2}\] of a revolution.
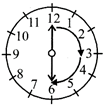
(iii) From 12 to 9, it turns through three right angles i.e. 270° and \[\frac{3}{4}\] of a revolution.
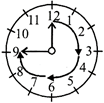
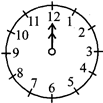
(iv) From 12 to 12, it turns through 4 right angles i.e. complete angle (360°) and one revolution
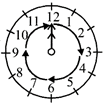
(v) 12 to 2 acute angle less than \[\frac{1}{4}\] of a revolution
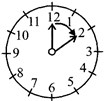
(vi) 12 to 5 obtuse angle more than \[\frac{1}{4}\] but less than \[\frac{1}{2}\] of a revolution.
(vii) 12 to 8 reflex angle more than \[\frac{1}{2}\] of a revolution but less than a complete revolution.
(viii) 12 to 12 complete angle equal to one complete revolution.
SYMMETRY
LINE OF SYMMETRY
A line which divides a given figure into two identical halves such that the given figure is symmemtrical about that line is called the line of symmetry or the axis of symmetry.
\[{{l}_{1}}\] and \[{{l}_{2}}\] are the lines of symmetry.
Note: A figure may or may not have a line of symmetry.
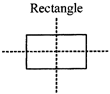
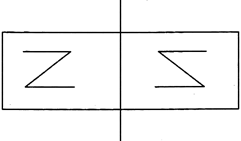
A vertical line which divides a given figure into two equal halves is known as 'vertical line of symmetry'.
For example:
![]()
A horizontal line divides a given figure into two equal halves is known as horizontal line of symmetry.
For example:
![]()
MAKING OF SYMMETRICAL FIGURES
1. INK BLOT DEVILS
Take a piece of paper and fold it into two equal halves.
Spill a few drops of ink on one half side
Press the two halves together and open up the page.
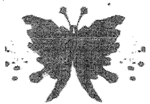
We will find that the resulting figure is symmetric about the folded line (line of symmetry).
2. INKED-STRING PATTERNS
Take a piece of paper and a small string. Fold the paper into two equal halves. Dip the string in a colored ink.
Arrange the dipped string on one half side. Press the halves together.
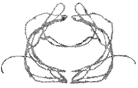
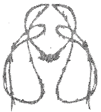
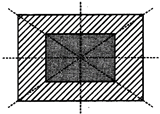
The resulting figure is symmetric about the fold line. Symmetrical figures with two lines of symmetry.

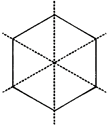
Symmetrical figures with more than two lines of symmetry.
For example
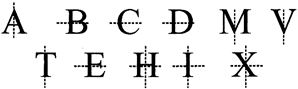
SYMMETRICAL ALPHABETS
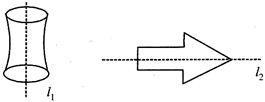
REFLECTION AND SYMMETRY
An object placed in front of a mirror, the object and the image are symmetrical with respect to the mirror line, the mirror line becomes the line of symmetry.
The image is the reflection of the object.
CIRCLE
A circle is a set of all those points in a plane whose distance from a fixed points remain^ constant.
The fixed point in the plane which has equal distance from every point on the boundary of the circle is called centre of circle.
Radius of a circle is the fixed distance between the centre and any point on the circle.
A chord of the circle is a line segment joining any two points on a circle.
A chord that passes through the centre of a circle is called diameter of the circle. Diameter is the longest chord diameter = 2 \[\times \] radius
CONSTRUCTION OF A CIRCLE WHEN ITS RADIUS IS KNOWN
Let us say we have to construct a circle of given radius V = 5 cm.
Steps of construction:
(i) Open the compass by placing it against a ruler for the required radius of 5 cm.
(ii) Mark a point C with a sharp pencil and consider it as centre of the circle.
(iii) Place the pointer of the compass on point C.
(iv) Turn the compass around the point C, to get the required circle.

Circle with radius
PC = 5 cm.
Centre ‘C’.
LINE SEGMENT
If we mark two points, say P and Q on the line \[l\] then the portion of the line from P to Q is called the line segment PQ.
![]()
CONSTRUCTING A COPY OF A GIVEN LINE. SEGMENT, SAY PQ
Steps of construction:
(i) Draw any line l, mark a point 0 on it.
(ii) Keeping the compass on PQ such that the pointer is on P and the pencil point is on Q.
Now, the opening of the compass gives the length of PQ.
(iii) Put the pointer on 0 and an arc that cuts the line at a point R (Say)
Now, OR is the copy of PQ.

PERPENDICULAR
Lines which intersects each other at right angles (90°) are called perpendicular lines.
DRAWING A PERPENDICULAR LINE TO A LINE THROUGH A POINT ON IT.
1. USING RULER AND A SET-SQUARE
Draw a line segment PQ = 6.5 (say) and mark a point R on it such that PR = 4.5 cm (say). Draw a perpendicular to PQ at R.
Step of construction
(i) Draw a line segment PQ = 6.5, mark a point R such that PR = 4.5. Place the ruler along the line PQ as shown in figure.
(ii) Place the set-square with its shortest side along PQ above the ruler.
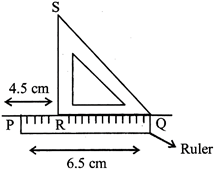
(iii) Slide the set-square along PQ untill its point S coincides with the given point R.
(iv) Holding the set-square, trace the line RS along the edge of the set-square.
Thus RS is perpendicular on PQ at R, i.e. \[RS\bot PQ\]
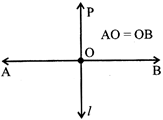
2. USING RULER AND COMPASS.
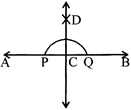
Draw a line segment AB = 8 cm (say) and mark a point C on it such that C lies in the midpoint of AB i.e.
AC = 4 cm draw a perpendicular to it through C.
Steps of Construction:
(i) Draw a line segment AB = 8 cm and mark a point C such that AC = 4 cm. With C as centre and radius less than 4 cm, draw an arc to intersect AB at P and Q.
(ii) Taking P as a centre and radius that should be more than PC, draw an arc on one side of AB.
(iii) Taking Q as a centre and taking the same radius as in step (ii), draw another arc to intersect the previous arc at D.
(iv) Draw a line passing through C and D to get CD.
CD is the required perpendicular to AB through C.
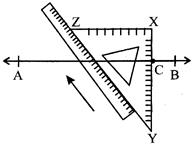
DRAWING A PERPENDICULAR TO A LINE THROUGH A POINT NOT ON IT.
1. USING RULER AND THE SET-SQUARE
Draw a line segment AB = 6 cm. Mark a point C outside AB. Draw a perpendicular to AB through the point C on AB.
Steps of Construction
(i) Place the set square just below the line AB in such a way that one of its sides containing right angle touches the line.
(ii) Place a ruler so that its edge is positioned along the side YZ of the set square.
(iii) Slide the set-square along the ruler until the side XY of the set square passes through the given point C.
(iv) Holding the set-square in the position as shown in the fig (ii) trace the line XY along the edge of the set-square
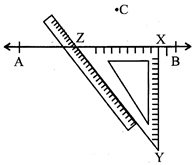
Thus XY is the perpendicular line to the given line AB passing through the point C.
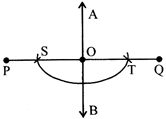
2. USING RULER AND COMPASS
Draw a line segment PQ = 7 cm. Mark a point A outside PQ. Draw a perpendicular to PQ through the point A on PQ.
Steps of Construction:
(i) With A as the centre and suitable radius, draw an arc to intersect PQ at S and T respectively.
(ii) With S as centre and taking a radius greater than \[\frac{1}{2}ST,\] draw an arc.
(iii) With T as centre and the same radius as in step (ii) draw another arc to intersect the previous arc at B.
(iv) Draw a line through A and B to obtain line AB.
Thus, AB is the required perpendicular to PQ through the given point P which is located outside PQ.
PERPENDICULAR BISECTOR OF A LINE SEGMENT
The perpendicular bisector of a line segment is the line that is perpendicular to the line segment at its mid-point.
DRAWING A PERPENDICULAR BISECTOR OF A LINE SEGMENT
1. WITH THE HELP OF TRANSPARENT TAPES.
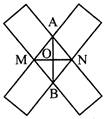
Steps of Construction:
(i) Draw a line segment MN
(ii) Place a strip of a transparent rectangular tape diagonally across with the edges of the tape on the end points M and N.
(iii) Repeat the above process by placing another tape over M and N just diagonally across the previous one.
Thus, two strips cross at A and B.
(iv) Join A and B to get AB and MN as the required perpendicular bisectors of each other.
2. USING RULER AND COMPASS
Draw a line segment of 7.5 cm and draw its perpendicular bisector.
Steps of Construction:
(i) Draw a line segment AB = 7.5 cm.
(ii) With A as the centre and radius more than half of AB, draw a circle.
(iii) With the same radius and B as centre, draw another circle that cut the previous circle at points C and D respectively.
(iv) Join CD, which divides AB into two equal parts. O is the mid-point of AB as AO = OB.
ANGLES
CONSTRUCTING AN ANGLE OF A GIVEN MEASURE
SUPPOSE TO CONSTRUCT AN ANGLE OF 110° (SAY)
Steps of Construction:
(i) Draw a ray OA.
(ii) Place the protactor on OA such that its centre coincide with the point 0 and 0° -180° line lies along OX.
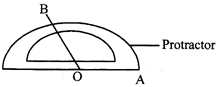
(iii) Mark a point B on the paper against the mark 110° on the protactor.
(iv) Remove the protactor and draw OB. \[\angle AOB={{110}^{\text{o}}}\] is the required angle.
CONSTRUCTING A COPY OF AN ANGLE OF UNKNOWN MEASURE
CONSTRUCT AN ANGLE EQUAL TO ZABC
Steps of Construction
(i) Draw a ray MN.
(ii) With B as a centre and suitable radius, draw an arc intersecting BA and BC at P and Q respectively.
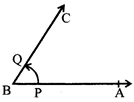
(iii) With M as a centre and the same radius as used in step (ii), draw an arc to intersect MN at O
(iv) With O as centre and radius equal to PQ, draw an arc to intersect the arc drawn from O to S.
(v) Join O and S and produce it to any point T.
\[\angle NMT\] is the required angle.
\[\angle NMT=\angle ABC\].

BISECTOR OF AN ANGLE
A line which divides given angle into two equal angles is called its bisector.
CONSTRUCT AN ANGLE BISECTOR OF THE GIVEN ANGLE
Steps of Construction:
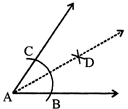
(i) Draw an angle A of given measure.
(ii) With A as centre and suitable radius draw an arc that intersects both arms of \[\angle A\] at points B and C respectively.
(iii) With B as centre, draw (in the interior of \[\angle A\]) an arc with radius more than half of BC.
(iv) With C as centre and same radius draw another arc that intersects the previous arc at point D.
(v) Join points A and D.
AD is the bisector of \[\angle A\].
\[\angle CAD=\angle BAD\]
ANGLES OF SPECIAL MEASURES
(60°, 30°, 120°, 90°, 45°)
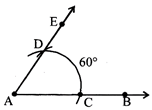
TO CONSTRUCT AN ANGLE OF 60° USING RULER AND COMPASS
(i) Draw a ray AB.
(ii) With A as the centre and a suitable radius draw an arc intersecting AB at C.
(iii) With C as the centre and same radius as in step II, draw another arc intersecting the previous arc at D.
(iv) Join AD and extend it to E. \[\angle EAB={{60}^{\text{o}}}\]
TO CONSTRUCT AN ANGLE OF 30° USING RULER AND COMPASS.
Steps of Construction
(i) Draw an \[\angle AOB={{60}^{\text{o}}}\]
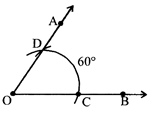
(ii) With C as centre, draw an arc with radius more than half of CD.
(iii) With D as centre and same radius draw another arc that intersects the previous arc at point E
(iv) Join points A and E. AE is the bisector of \[\angle AOE\,=\frac{1}{2}\angle AOB={{30}^{\text{o}}}\] i.e.
\[\angle AOE=\angle BOE={{30}^{\text{o}}}\]

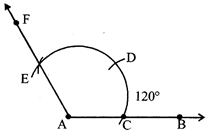
TO CONSTRUCT AN ANGLE OF 120° USING RULER AND COMPASS.
Steps of Construction
(i) Draw a ray AB.
(ii) With A centre and a suitable radius draw an arc intersects AB at C.
(iii) With C as the centre and same radius, as in step II, draw another arc intersects the previous arc at D.
(iv) With D as the centre and same radius, draw another arc intersects the first arc at E.
(v) Join AE and extend to F.
(vi) \[\angle BAF={{120}^{\text{o}}}\]
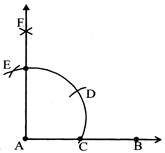
TO CONSTRUCT AN ANGLE OF 90° USING RULER AND COMPASS
Steps of Construction
(i) Draw a ray AB
(ii) With A as centre and a suitable radius draw an arc intersects AB at C.
(iii) With C as the centre and same radius draw another arc that intersects the previous arc at D.
(iv) Taking D as centre and same radius, draw another arc that intersects same arc at E.
(v) Now, with D and E as centres and a suitable radius, draw two arcs that intersect each other at F. Join AF,\[\angle BAF={{90}^{\text{o}}}\]
TO CONSTRUCT AN ANGLE OF 45° USING RULER AND COMPASS
Steps of Construction
(i) Draw an angle, \[\angle PQR={{90}^{\text{o}}}\]
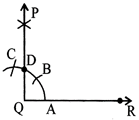
(ii) With A as centre draw an arc with radius more than half of AD.
(iii) With D as centre and same radius draw another arc that intersects the previous arc at point E.
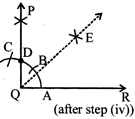
(iv) Join points Q and E.
QE is the bisector of \[\angle PQR=\frac{1}{2}\,\angle PQR={{45}^{\text{o}}}\]
i.e., \[\angle PQE=\angle EQR={{45}^{\text{o}}}\]


You need to login to perform this action.
You will be redirected in
3 sec

