Introduction to MS-PowerPoint 2013
Category : 6th Class
Introduction to MS-PowerPoint 2013
Introduction
PowerPoint (PPT) is a powerful, easy to use presentation graphics software program which allows you to create professional ? looking electronic slide shows. PPT is very useful that allows the user to create "presentation slides" that can be displayed on the computer screen or through a projector that is plugged into the computer. Slideshows can include animation, narration, images, videos, and much more.
Few New Features added in PowerPoint 2013
Theme variations
In MS-PowerPoint 2013, themes now come with a set of variations, like different color palettes and font families. And it provides new widescreen themes along with standard sizes. Choose a theme and variant from the start screen or from the design tab.
More choices for getting started
Instead of opening with a blank presentation, PowerPoint 2013 gives you several ways to start your next presentation using a template, a theme, a recent presentation, or a blank one.
Insert Online Video, Image and Audio
PowerPoint 2013 now allows you to add videos, images and audio files directly without first downloading them from the internet to your PC. It allows you to insert an online video in your presentation using the integrated Bing Video Search or YouTube. For instance, to add a YouTube video, just search for it, select the required video from the search results and click ok to add it to your presentation.
Presenter View
Presenter view allows you to see your notes on your monitor while the audience only sees the slide. In previous releases, it was difficult to figure out who saw what on which monitor. The improved presentation view fixes that problem and makes it simpler to work with.
Color Picker
PowerPoint now includes color picker tool. It has eyedropper, to pick up and apply fill, outline and font colors options. To select a color on the slide, simply click on the eyedropper button and then click on the desired color.
Touch Screen
Microsoft has designed PowerPoint 2013 to support touch-screen devices. With touch mode enabled, there will be more space between menu items which makes it easier to use PowerPoint 2013 with your fingers rather than a mouse. You can turn on Touch mode by clicking the Touch mode button on the Quick Access Toolbar.
Creating PowerPoint Presentation:
v Click on windows button.
v Click All Apps and select Microsoft office.
v Under the Microsoft office list select PowerPoint.
v Click on New option or you may select any suitable template from the list.
Or
v Simply make use of Windows 10 cortana. Type PowerPoint in the search box. Then select the blank presentation or any suitable template of your choice.
PowerPoint window:
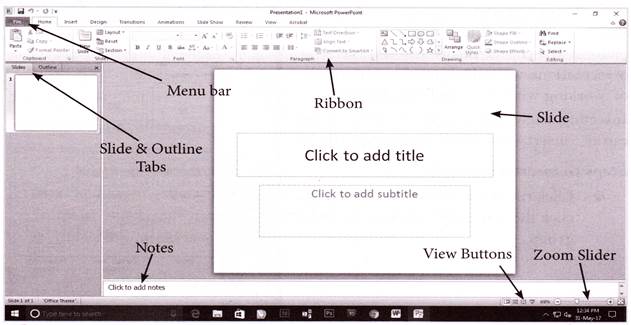
v Quick Access Toolbar: It contains common commands such as save, undo and print. You can add more commands as well.
v Title bar: It displays the name of the program you are using and the name of presentation, you are currently working on.
v Close button: Click here to close the current presentation.
v Ribbon: The tabs on the Ribbon replace the menus and toolbars found in previous versions of PowerPoint.
v Slide Pane: It displays the slide you are currently working on.
v Notes Pane: Type any notes you want to use during a presentation here.
v View Buttons: Use these buttons to quickly switch between normal, slide sorter and slide show views.
v Status Bar: It displays information about your presentation, such as your current location in the presentation.
v Outline Tab: It focuses on the content of your presentation rather than its appearance. Use the outline tab when you want to add large amount of text to a presentation.
v Slide Tab: It contains a thumbnail image of every slide in the presentation. Click a thumbnail to jump to that slide.
Inserting Slides and Selecting a Layout
PowerPoint Presentations are made up of a series of slides. Slides might include text, pictures and charts. Before you start creating presentations, you will need to know the basics of working with slides and slide layouts.
Inserting a new slide is quick and easy. Or you can also insert a new slide by pressing Ctrl+M.
Steps to insert a new slide:
v Click the Home tab on the Ribbon and click the new Slide button in the slides group.
Understanding Slides and Slide Layouts
When you insert a new slide, it will usually have placeholders. Placeholders can contain different types of content, including text and images. Some placeholders have placeholder text, which you can replace with your own text.
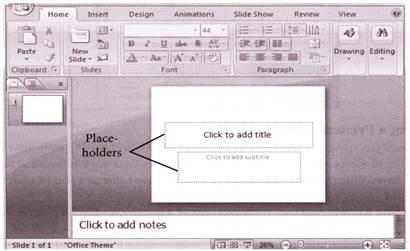
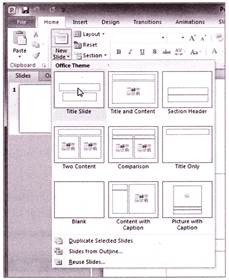
Slides have different layouts for placeholders, depending on the type of information you want to include. Whenever you create a new slide, you will need to choose a slide layout that files your content.
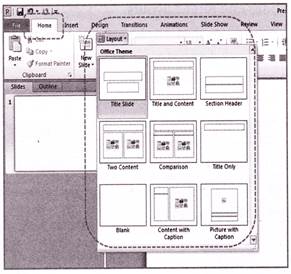
Selecting a Layout:
If you want to select different layout for your slide follow the following steps:
v Click the Home tab on the Ribbon and click the layout button in the slides group.
v The Layout gallery appears.
v Select the layout you want to use.
v The New layout is applied to the slide Layout.
Saving a Presentation
Whenever you create a new workbook in MS-Excel, you will need to know how to save it in order to access and edit it later. It offers two ways to save a file: Save and Save As.
v Save: When you create or edit a workbook, save command will be used to save the changes.
v Save As: Save as is used to create a copy of a workbook while keeping the original. You will need to choose a different name and location for the copied file.
Steps to Save/Save As a Presentation:
v Click the File menu and select Save/Save As option
v The Save/Save As dialog box will appears.
v Specify the drive or folder where you want to Save/Save As the presentation.
v Click on Save/Save As.


You need to login to perform this action.
You will be redirected in
3 sec

