4th Class Computers Science Paint Brush Paint Brush Menus

Paint Brush Menus

Category : 4th Class

*       Paint Brush Menus


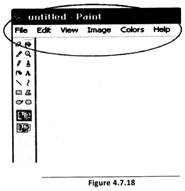
Knowing how to use menu commands is a basic Windows skill. The Menus appear directly beneath the Title Bar in the window. There are six menus in the Paint window. We call them "Menus" because they work like a menu at a fast food restaurant. When you want to place an order at a restaurant, you look up on the wall for what you want and then select it. The computer works in the same way. You just look in the menu and then select the item that you want. A complete list of all the items on the menu would take up a lot of screen space so the menu items "hide" most of the time. To bring up a menu in its entirety, just click Menu's heading, and the rest of the menu will "pull down". We're going to learn how to use the various commands in each of the menus in Microsoft Paint.  


*   The File Menu

The File Menu is where you will find commands that affect the basic operations of the file you are working with. This is where you would go to create a new file, open a file, save a file or print a file. We will look at the options in the File menu now.


  • New: Creates a new, blank (white) image file.


  • Open: initiates the Open dialog box to open(view)an existing image file. In Paint only one image file can be opened at one time. If you try to open a second file, the first file will be closed automatically


  • Save: Save changes to the current file.


  • Save As: Save changes to the current file and allows you to pick a new or different file name for the file.


  • Print Preview: Displays the image on screen as it will appear when it is printed out on paper. This lets you get a sense of how big the image will be when you print it to the page.


  • Page Setup: Displays options for setting up how Paint will print your file.


  • Print: Displays the Print dialog box, where you can print out the current image file.


  • 1, 2, 3: Opens the 1st, 2nd or 3rd previous files opened with Paint.


  • Exit: Shuts down Paint. Now let us take a look at the Edit Menu.  


*       The Edit Menu

The Edit Menu is where you will find most of your commands that are useful for working within your file to make changes of one kind or another.

  • Undo: This is one of the most important commands to remember. Undo will remove the last change you made to the file. For instance, if the last thing you did was to draw a line with the Line Tool, selecting Edit ® Undo would remove the line.


  • Cut, Copy, Paste: Cut, along with Copy, and Paste are some of the most useful commands in Paint. These are used in conjunction with the Selection tools. First, use either the rectangular or freeform Selection tool to select a portion of the image. The Cut command will remove the selection from the image, just as though you cut it out with a pair of scissors. The Cut portion of the image is stored in the computer's copy buffer, where it can be retained temporarily. Copy works in the same way as Cut, but it does not remove the selection from where it originally appears in the image. Paste enables you to get the contents of the copy buffer back into the image, where you can move it around before deselecting it. Cut and Paste are good for moving bits of an image around. Copy and Paste are good for duplicating portions of an image to create a motif or pattern or collage-like effect. 


  • Clear Selection: Clear Selection is also used in conjunction with the Selection tools. When you use Clear Selection, whatever is in the selection will be deleted.


  • Select All: This command automatically selects the entire image. You can then use Cut, Copy, Paste or Clear Selection.


  • Copy To, Paste From: These commands work with an outside file instead of the copy buffer. The copy buffer is like an invisible file that is associated with the Paint Program itself. This is useful, but limited, because only one thing can be in the copy buffer at a time, and when Paint is shut down the contents of the copy buffer may be lost. Or, if you are working with two programs, such as Paint and Microsoft Word, using the Copy command in one program may overwrite the contents of the copy buffer in the other program. To keep more than one object in the copy buffer at a time, you can use the Copy To/Paste from commands. You must have something selected in order to Copy To. Whatever you have selected gets saved as a separate file. Paste To works in a complimentary fashion, by pasting the contents of some separate file into your active Paint file.  


*     The View Menu

With the View Menu, you can toggle whether the Tool Box, Colour Box, or Status Bar will be displayed here. You can also set the Zoom here. View Bitmap will display the image at full size all by itself with none of the usual Paint window objects to get in the way. Tip: If the Tool Box, Colour Box or Status Bar is missing in the main Paint window and you cannot see it that means they are hidden. To make them visible, go into the View Menu and make sure that the check mark appears next to each in the menu.  


*     The Image Menu

Next to the File and Edit menus, the Image Menu is probably the menu where you will find the most useful features. You can use these tools to alter your image or selection in a number of interesting and useful ways.

  • Flip/Rotate: Flip will allow you to "flip" the selection over like a pancake. You can select between horizontal or vertical for the direction of your flip. This is good if you need to create a "mirror image" of a selection. Rotate will rotate the selection to right-angle rotations (that is, 90,180 and 270 degrees of rotation.)


  • Stretch/Skew: Stretch will let you change the proportions of the selection, making them narrower, wider, shorter or taller. The ratio of the selection's height and width will change, and will result in some distortion of the image. Skew is similar to stretch, but it affects opposing edges oppositely. For example, a horizontal skew might shift the top of the image to the right while the bottom of the image stretches to the left. This results in an effect that can be used in making an illusion of 3-D Perspective.


  • Invert Colours: With this option, you will get an effect similar to a photographic negative.


  • Attributes: This is the place where you can change the basic image attributes such as height and width (which can be measured in pixels, inches or centimeters) and colours.


  • Clear Image: This wipes out the image, leaving you with a blank file with the same image dimensions.


  • Draw Opaque: This makes the current selection either opaque or transparent.    


*    The Colours Menu  

The colours menu only has one command in it, Edit Colours.

The interface for this command is a bit complicated compared to the rest of the commands studied till now. (See Figure 4.7.19)


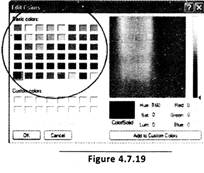
The basic Edit Colours window will open up on top of the regular Paint window when you select Edit Colours from the Colours Menu. From here, you can customize your colour palette. Since there are only a small number of colours available through the basic Colour Palette, you will probably need some custom colours at some point if you are doing a lot of actual drawing with  the drawing Tools. To do this, click on "Define Custom Colours". This button will cause the Edit Colours window to expand, and you will be able to select new colours from the Colour Picker. The Colour Picker allows you to pick from a wide variety of shades in the RGB colour gamut. RGB colour is the colour scheme used by mixing the primary colours of light, Red, Green and Blue, and is the basis for all colour computer graphics. To pick a colour, click on the region where your desired colour appears. You can adjust the lightness or darkness of the shade by clicking on the shading bar at right. The colour you have currently picked will show up in the box beneath the gamut box. If you like this colour, you can add it to your colour palette by clicking Add to Custom Colours. The new colour will then appear in the Custom Colours palette.        


Question.jpg    


 Fill in the blanks:

1. The File Menu is where you will find commands that affect the _______ of the file you are working with.

2. The colours menu only has one command in it, ________ Colours.

3.  Clear Selection is also used in _______ with the Selection tools.

(A) Changes, File, Injunction                      

(B) Basic operation, View, Conjunction

(C) Modification, Insert, Injunction         

(D) Basic operation, Edit, Conjunction

(E) Changes, Tools, Injunction  


Answer: (d)

Explanation

Correct Option:

(D) Options given in (D) are correct.

Incorrect Options:

(A) Options given in (A) are incorrect.

(B) Options given in (B) are incorrect.

(C) Options given in (C) are incorrect.

(E) Options given in (E) are incorrect.      


 Match the following:

       A                                                   B

1. File Menu                               i.   Tool box

2. Edit Menu                              ii.   Save option

3. View Menu                             iii. Undo option

(A) 1, i; 2, ii; 3, iii                                               

(B) 1, iii; 2, ii; 3, i

(C) 1, ii; 2, iii; 3, i                                               

(D) i, ii; 2, i; 3, iii

(E) 1, iii; 2, i; 3, ii  


Answer: (c)

Explanation

Correct Option:

(C) Option (C) is matched correctly.

Incorrect Options:

(A) Option (A) is matched incorrectly.

(B) Option (B) is matched incorrectly.

(D) Option (D) is matched incorrectly.

(E) Option (E) is matched incorrectly.    


You Know.jpg 

  • Paint Brush is often referred to as MS Paint, Microsoft Paint or simply Paint.    


Important.jpg   

  • Windows: An operating system which controls the execution of all types of programs.    


Summary.jpg   

  • Paint Brush for Windows is a simple graphics painting program that has been included with all versions of Microsoft Windows.
  • Resources on Net: http://www.wikipedia.org
  • Related Topics Fundamentals of Windows - Chapter 7  


*    Abbreviations

BMP          -          Bitmap

F/R             -          Flip/Rotate

S/S             -          Stretch/Skew


You need to login to perform this action.
You will be redirected in 3 sec spinner